JDK
下载
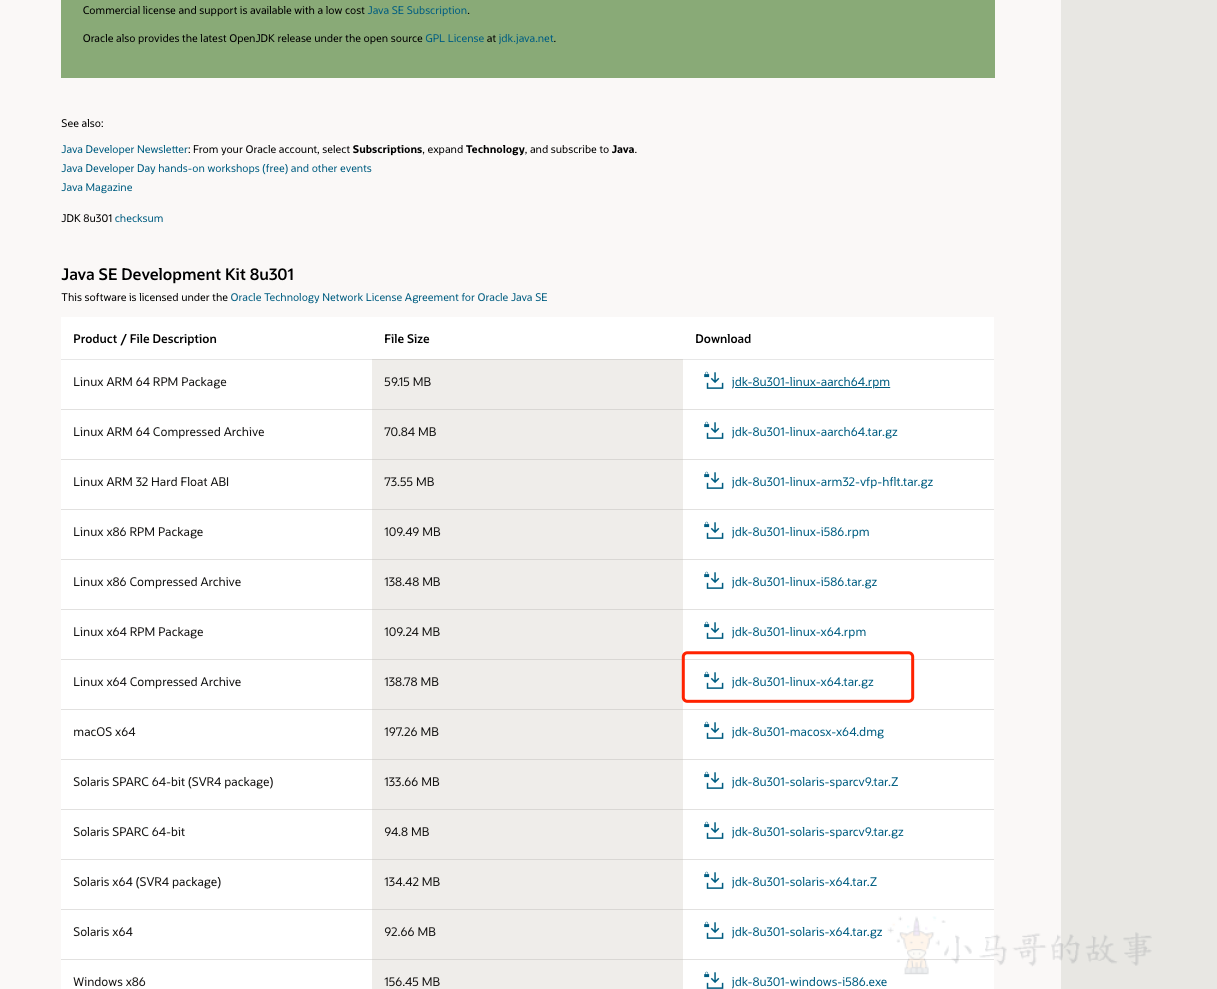
官网下载 JDK8:http://www.oracle.com/technetwork/java/javase/downloads/jdk8-downloads-2133151.html

安装
# 创建目录
mkdir /usr/local/java
# 拷贝安装包到指定目录
cp jdk-8u301-linux-x64.tar.gz   /usr/local/java/
# 进入java安装目录
cd /usr/local/java/
# 解压jdk安装包
tar -zxvf jdk-8u301-linux-x64.tar.gz
# 删除安装包(可选)
rm -rf jdk-8u301-linux-x64.tar.gz
配置环境变量
# 编辑配置文件
vim /etc/profile
# 最下面添加如下内容:
export JAVA_HOME=/usr/local/java/jdk1.8.0_301
export CLASSPATH=$JAVA_HOME/lib/
export PATH=$PATH:$JAVA_HOME/bin
****************
或者添加下面这种
JAVA_HOME=/usr/local/java/jdk1.8.0_301
CLASSPATH=$JAVA_HOME/lib/
PATH=$PATH:$JAVA_HOME/bin
export PATH JAVA_HOME CLASSPATH

# 然后ESC :wq保存退出
:wq
# 配置生效
source /etc/profile
# 检查安装情况
java -version
Maven
下载
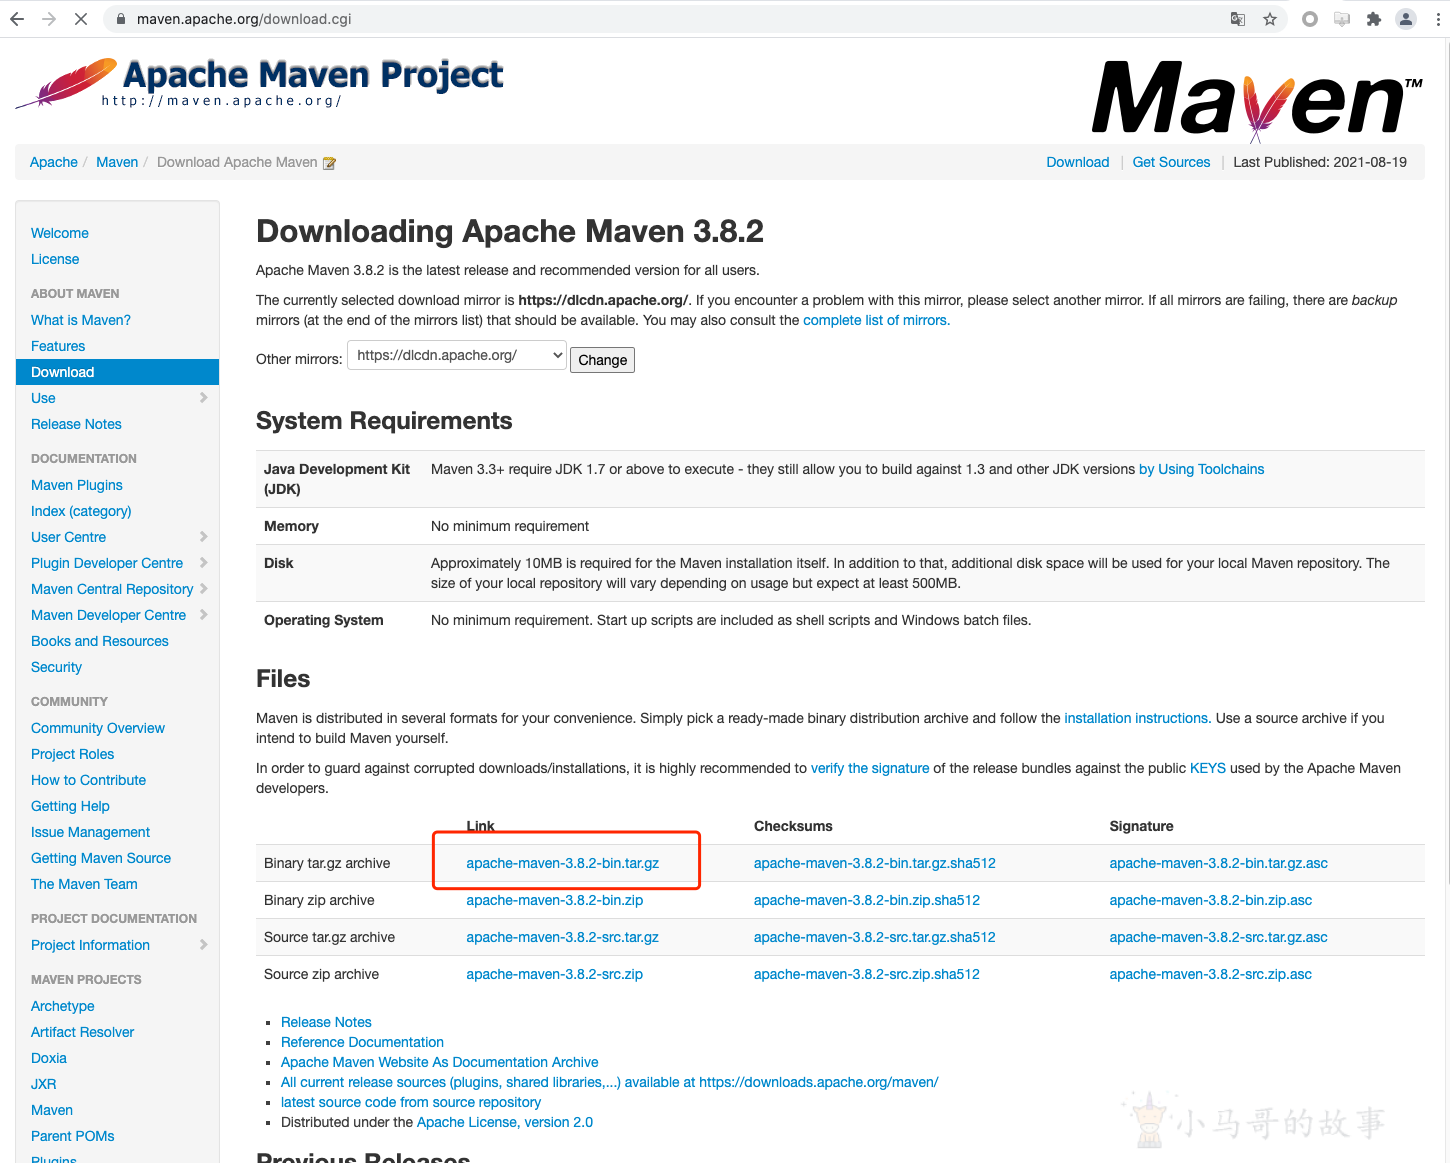
官网下载地址: https://maven.apache.org/download.cgi

安装
# 创建目录
mkdir /usr/local/maven
# 解压到创建目录下
tar -zxvf apache-maven-3.8.2-bin.tar.gz -C /usr/local/maven/
# 进入maven安装目录 下面有文件则没有问题
cd /usr/local/maven/apache-maven-3.8.2
*********************************************************
[root@xmg-gz apache-maven-3.8.2]# ls
bin  boot  conf  lib  LICENSE  NOTICE  README.txt
配置
# 编辑配置文件
vim /etc/profile
# 最下面添加如下内容:
export MAVEN_HOME=/usr/local/maven/apache-maven-3.8.2
export MAVEN_HOME
export PATH=$PATH:$MAVEN_HOME/bin
# 然后ESC :wq保存退出
:wq
# 配置生效
source /etc/profile
# 检查配置情况
mvn -version
MYSQL
背景信息
-
MySQL:5.7.33
MySQL相关安装路径说明如下:
- 配置文件:/etc/my.cnf
- 数据存储:/var/lib/mysql
- 命令文件:/usr/bin和/usr/sbin
-
数据库端口:3306
安装mysql
# 更新YUM源
rpm -Uvh  https://dev.mysql.com/get/mysql57-community-release-el7-9.noarch.rpm
# 安装MySQL
yum -y install mysql-community-server
# 查看MySQL版本号
mysql -V
配置MySQL
# 启动MySQL服务
systemctl start mysqld
# 设置MySQL服务开机自启动
systemctl enable mysqld
# 查看/var/log/mysqld.log文件,获取并记录root用户的初始密码
grep 'temporary password' /var/log/mysqld.log
# 执行命令结果示例如下。
2020-04-08T08:12:07.893939Z 1 [Note] A temporary password is generated for root@localhost: xvlo1lZ12>uI
# 对MySQL进行安全性配置需要初始密码
mysql_secure_installation
安全性配置
重置root用户的密码
#确保MySQL服务器部署的安全。
Securing the MySQL server deployment.
#输入root用户的密码:  输入上一步获取的root用户初始密码
Enter password for user root:
#root用户的密码已经过期。请设置新密码。
The existing password for the user account root has expired. Please set a new password.
#新密码:
New password:
#重新输入新密码:
Re-enter new password:
#'validate_password'插件安装在服务器上。
The 'validate_password' plugin is installed on the server.
#后续步骤将使用现有配置运行的插件。
The subsequent steps will run with the existing configuration
of the plugin.
#使用现有的root密码。
Using existing password for root.
#估计密码强度:100
Estimated strength of the password: 100
#修改root用户密码?(按y| y表示是,其他任何键表示否):y
Change the password for root ? ((Press y|Y for Yes, any other key for No) : y
#新密码: 长度为8至30个字符,必须同时包含大小写英文字母、数字和特殊符号。特殊符号可以是()` ~!@#$%^&*-+=|{}[]:;‘<>,.?/
New password:
#重新输入新密码:
Re-enter new password:
#估计密码强度:100
Estimated strength of the password: 100
#您希望继续使用所提供的密码吗?(按y| y为Yes,按其他键为No): y
Do you wish to continue with the password provided?(Press y|Y for Yes, any other key for No) : y
删除匿名用户账号
#默认情况下,MySQL安装有一个匿名用户,允许任何人登录到MySQL,而无需为他们创建用户帐户。这只用于测试,并使安装过程更顺畅。您应该在转移到生产环境之前删除它们。
By default, a MySQL installation has an anonymous user, allowing anyone to log into MySQL without having to have a user account created for them. This is intended only for testing, and to make the installation go a bit smoother. You should remove them before moving into a production environment.
#删除匿名用户?(按y| y为Yes,按其他键为No):
Remove anonymous users? (Press y|Y for Yes, any other key for No) : Y  #是否删除匿名用户,输入Y
Success.
禁止root账号远程登录
# 通常,根应该只允许从“localhost”。这就保证了别人猜不到来自网络的根密码。
Normally, root should only be allowed to connect from 'localhost'. This ensures that someone cannot guess at the root password from the network.

#禁止root远程登录?(按y| y表示是,其他键表示否):
Disallow root login remotely? (Press y|Y for Yes, any other key for No) : Y #禁止root远程登录,输入Y
Success.
删除test库以及对test库的访问权限
默认情况下,MySQL自带一个名为“test”的数据库任何人都可以访问。这也仅用于测试,并且应该在进入生产之前被删除环境。
By default, MySQL comes with a database named 'test' that anyone can access. This is also intended only for testing,and should be removed before moving into a production environment.

删除测试数据库并访问它?(按y| y表示是,其他键表示否)
Remove test database and access to it? (Press y|Y for Yes, any other key for No) : Y #是否删除test库和对它的访问权限,输入Y
- Dropping test database...
Success.
重新加载授权表
#重新加载特权表将确保所有更改到目前为止所做的将立即生效。
Reloading the privilege tables will ensure that all changes made so far will take effect immediately.

#现在重新加载特权表?(按y| y表示是,其他键表示否)
Reload privilege tables now? (Press y|Y for Yes, any other key for No) :
Success.
All done!
安全性配置的更多信息,请参见MySQL官方文档。
远程访问MySQL数据库
配置安全组策略
阿里云服务器安全组配置>配置规则>添加安全组 授权对象 0.0.0.0/0表示任意的IP。
| 授权策略 | 优先级 | 协议类型 | 端口范围 | 授权对象 | 描述 | 创建时间 | 操作 | |
|---|---|---|---|---|---|---|---|---|
| 允许 | 1 | 自定义 TCP | 目的: 3306/3306 | 源: 0.0.0.0/0 | mysql数据库 | 2021年7月21日13:04:05 | 编辑复制删除 |
修改表法
# 进入mysql 输入密码
mysql -u root  -p
# 切换数据库
use mysql;
# 修改数据库数据
update user set host = '%' where user = 'root';
# 查询修改结果
select host,user from user where user = 'root';
授权法
#你想myuser使用mypassword(密码)从任何主机连接到mysql服务器的话。
grant all on *.* to 'myuser'@'%' IDENTIFIED BY 'mypassword';
#使用root替换 myuser,可设置为允许root账号远程登录。

#如果你想允许用户myuser从ip为192.168.1.6的主机连接到mysql服务器,并使用mypassword作为密码
grant all on *.* to 'myuser'@'192.168.1.6' IDENTIFIED BY 'mypassword';
#使修改生效
FLUSH  PRIVILEGES
在采用授权法之后,无法在本地登录mysql 提示ERROR 1045 (28000): Access denied for user 'root'@'loadb116' (using password: YES) 上例中loadb116是主机名. 这时可以使用root进入后授权
grant all privileges on *.* to 'root'@'loadb116' identified by '123456' with grant option;

flush  privileges;
或者使用本地IP登录
重启服务
systemctl restart mysqld
如果此时连不上,重启一下 reboot
Redis
redis下载
下载地址:http://redis.io/download,下载最新稳定版本。
mkdir /usr/local/redis/
wget http://download.redis.io/releases/redis-6.0.8.tar.gz
tar xzf redis-6.0.8.tar.gz
安装
# 进入redis目录
cd redis-6.0.8
# 安装 gcc  则直接进行编译 make
yum -y install gcc # 如果不安装会编译报错
# -------------如果还报错  临时升级版本 start
 gcc -v                             # 查看gcc版本

 yum -y install centos-release-scl  # 升级到9.1版本

 yum -y install devtoolset-9-gcc devtoolset-9-gcc-c++ devtoolset-9-binutils

 scl enable devtoolset-9 bash
 # -------------如果还报错  临时升级版本 end
# 编译
make
安装成功会出现:Hint: It's a good idea to run 'make test'
执行make test 进行测试,如果出现如下错误:
[root@localhost redis-6.0.1]# make test
cd src && make test
make[1]: 进入目录“/usr/redis-6.0.1/src”
    CC Makefile.dep
make[1]: 离开目录“/usr/redis-6.0.1/src”
make[1]: 进入目录“/usr/redis-6.0.1/src”
You need tcl 8.5 or newer in order to run the Redis test
make[1]: *** [test] 错误 1
make[1]: 离开目录“/usr/redis-6.0.1/src”
make: *** [test] 错误 2
解决办法
# 安装 tcl
yum install tcl

make test
修改配置文件
# 修改配置文件
vi redis.conf
# 修改 #bind 127.0.0.1 为bind 0.0.0.0 -> 允许所有主机访问
69 # bind 127.0.0.1
70       bind 0.0.0.0
# 将daemonize no 改成 daemonize yes -> 设置redis可以一直在后台运行,以守护进程方式运行
225 daemonize yes
#  密码设置,将”#requirepass foobared“ 取掉注释改成 requirepass 123456(或者其它你需要的密码)
791 requirepass 123456
GZA$bXZwnbe!6j
设置开机启动
# 创建存放redis的配置文件
mkdir /etc/redis
# 创建存放redis的持久化文件 (可选)
mkdir /var/redis/
mkdir /var/redis/6379
# 拷贝配置文件
cp /usr/local/redis/redis-6.0.8/redis.conf /etc/redis/6379.conf
# 检查一下配置
daemonize	yes							#让redis以daemon进程运行
pidfile		/var/run/redis_6379.pid 	#设置redis的pid文件位置
port		6379						#设置redis的监听端口号
dir 		/var/redis/6379				#设置持久化文件的存储位置 (可选)


# 拷贝脚本到开机启动脚本目录下
cp   /usr/local/redis/redis-6.0.8/utils/redis_init_script  /etc/init.d/redis_6379
cd /etc/init.d/
vim redis_6379
# 最上面,加入两行注释
# chkconfig:   2345 90 10
# description:  Redis is a persistent key-value database
# 修改 以下两个地址 为自己的文件地址
EXEC=/usr/local/redis/redis-6.0.8/src/redis-server
CLIEXEC=/usr/local/redis/redis-6.0.8/src/redis-cli
# 授权
 chmod 777 redis_6379
# 启动 redis
./redis_6379 start
# 执行 加入开机启动
chkconfig redis_6379 on
本文由 小马哥 创作,采用 知识共享署名4.0 国际许可协议进行许可
本站文章除注明转载/出处外,均为本站原创或翻译,转载前请务必署名
最后编辑时间为:
2024/08/19 07:42


66666